Quote

Black Lives Matter

Thursday 17 February 2022

Turquoise Shrug

I wanted a little shrug to wear on top of the sleeveless dress, some time ago I had printed out a free pattern, so once I'd found it I stuck it together and used it. (I will share the link to the free pattern further down but have some issues with it).


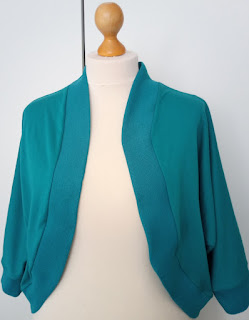
Here's my version, the teal ribbing is a slightly different shade to the main knit use, but was the closest I had.

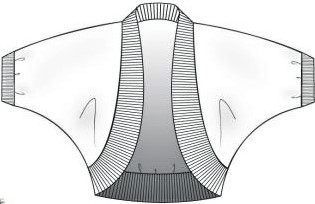
Here's the line drawings for the garment, I made a size 14 (thinking US sizing) and cut the neckline ribbing the same width as the cuffs (on the pattern its twice the width which I thought would be too much).


The pattern I used is the Slinky Shrug, free download from Fabric.com.

You'll adore this super-simple Shrug designed for drapery knits and woven fabrics, and finished with a stretchy rib trim. You can also use a self-fabric finish around the shrug if you are using knits. Try rayon, cotton, bamboo or silk knits, or choose soft, drapery wovens like georgette or crepe.

Relaxed-fit, batwing-sleeved Shrug has a curved edge-to-edge front and 3/4 length sleeves. The neckline, hem and sleeves are finished with a deep ribbed trim. Shrug finishes at the hip.

Wear this fabulously easy Shrug to add a little festive glamour to a classic pants-and-T-shirt look, or slip it on over your favorite party dress for a little extra warmth and coverage.

It's an old pattern which has been on their site for a long time. I quite like the style BUT it is very poorly laid out in the PDF and uses 27 pages of paper (I'm hoping this is due to the limited technology for creating pdf patterns at the time). I would actually recommend that you save half a tree and do a rough draft of a batwing top and then some rectangles of ribbing for the cuffs and neckband.

If you still want to download it then its here - Slinky Shrug - Discount Designer Fabric - Fabric.com


Tuesday 15 February 2022

Linen summer dress

Well I'm ready for Summer even though it is months away, with my new black linen printed sleeveless dress.


Ok let me explain! My friend C is getting into sewing more and comes round to my sewing room so we can work on projects together.

It has been great working with her. Her aesthetic is different to mine and she wants to try all sorts of techniques, so helping her is really keeping me on my toes.

She loves the style of Gretchen “Gertie” Hirsch and has several of her books including "Gertie sews Jiffy Dresses"


She decided she would like to sew the Popover dress from the book (its the one on the cover), but without the shoulder bows and pockets, but with waistline shirring.
I don't have a photo of her dress, which we made from a black floral viscose that draped beautifully but was a challenge to cut out!

We split the sewing between 2 sessions, so in between I managed to cut out a version for myself and partly sew it up, finishing it after we'd finished C's dress.

Sizing: the popover dress has a lot of ease so we went on the finished garment measurements in the book, and chose a size which allowed a little bit of ease. This was 2 sizes smaller than indicated by our measurements.

Layout: We did not use either of the cutting layouts given in the book. 

C's fabric had an obvious directional print, so we cut the 4 pieces out single layer, making sure to flip the pattern piece to have pairs (and not all left side pieces!). This used more fabric than the book indicates.

Here's a photo of C's fabric and the shirring, I don't have one of the whole dress.

My fabric was very limited yardage (2 metres of 150 cm wide), but as the floral print looked OK in any direction I wasn't limited to one direction. So I folded the fabric crossways and cut the pieces out with the centre front on the diagonal, I had to narrow the skirt very slightly to fit it on. The bias sleeve facings came from the centre, and I even managed to cut some inseam pockets from the corners. As the side seams on my dress were on the cross grain, it was nice and stable and able to support the pockets.

Shirring: C was very keen to have the shirred waist option, and it really gives the dress shape, so definitely a good call. I copied! Although there is a line for the shirring marked on the pattern, I got C to try the dress on, added an elastic belt and then marked (with a sliver of soap) where we wanted the shirring to go. We started with 7 rows of shirring, but increased it to 10.

I marked mine in a similar way and also did 10 rows of shirring. Here's a shot of the inside of my dress.

Saturday 12 February 2022

Multi Shirt Completed

I finished and wore my multi fabric shirt before I took a photo, so apologies for the wrinkles.

It is great to wear with jeans to go to the pub!


A friend asked me if it was a CLAUDIO LUGLI shirt, which is a great compliment!

The pattern I used is from March 2020 Prima Magazine (a UK women's magazine).
I shortened the shirt dress pattern to be a shirt.


The fabrics used were all leftovers from other projects - the red paisley was mine, the blue with spots from Auntie A and the floral stripe from my mum.

I used white overlocker thread and white thread for the inner seams (as all the fabrics were printed on a white base). However for the visible stitching (topstitching, buttonholes, hem) I alternated between the red and blue to match the fabric. I lost count of how many times I changed the thread on the sewing machine during construction but it was definitely worth it for the final effect.

Sunday 6 February 2022

Choosing thread

Here are some thread choices. White and pale grey stand out too much imho
Red no good on blue
So its dark blue or dark grey - I think dark grey has the edge, though may not use for the buttonholes


Here's what the project is going to be, a multi fabric shirt (the back is the same fabric as the sleeves)