
Saturday, 29 December 2012
Winter Sewing
Here's the items I've sewn so far in the Nov-Jan window for the current 6PAC collection on Stitchers Guild.
 It is OK. I have previously made/purchased bottoms to wear with the tops!
SWAP 2013: Narrow stripe top
This is another of the turtleneck tops, made from my modified pattern. This stripe fabric came from the stash to replace the printed stripe which had the stripes going up and down.
It doesn't have much stretch and was clearly cut from a tube quite roughly, so the edges are not parallel. However once I lined up the stripes rather than the edges the cutting out went fine.
Here's the original sketch of the narrow striped top :-
 And here's what the completed top actually looks like :-
 I'm not going to win any illustration prizes, but I think it gives a reasonably good impression of what the garment is likely to look like.
The hems are level in the photo, which shows how wonky I am, since those shoulder seams sit neatly on my shoulders when worn! You can just see a little bit of the centre back seam through the neckline, this is heavily curved to fit the sway back and round upper back, so looks a bit strange on a flat hanger. These tops are sooooooo comfortable, no tugging, gaping or cold gaps - fantastic.
Also part of SWAP is this red version with cuffs which I made in December, and is one of my previously sewn items.
 I am using this one instead of the 'Lend Me Your Shoulder' top made from the same fabric, as the neckline will work better with the boiled wool jacket when I get around to making it.
 The navy denim skirt which will be my other previously made item needs the back split fixing, and a light press and then I'll show that too.
Here's my progress to date :-

I'm away for the weekend/New Year so probably won't have anything more to post for a while. Hence why I am sewing like crazy whilst I have a couple of days to do so.
(Hopefully the cream curtain covering the fabric shelving makes a better backdrop than the bathroom door used previously, so I shall use this for the dreaded hanger shots going forwards. For the actual SWAP entry I shall have photos of me wearing the clothing.)
It doesn't have much stretch and was clearly cut from a tube quite roughly, so the edges are not parallel. However once I lined up the stripes rather than the edges the cutting out went fine.
Here's the original sketch of the narrow striped top :-


The hems are level in the photo, which shows how wonky I am, since those shoulder seams sit neatly on my shoulders when worn! You can just see a little bit of the centre back seam through the neckline, this is heavily curved to fit the sway back and round upper back, so looks a bit strange on a flat hanger. These tops are sooooooo comfortable, no tugging, gaping or cold gaps - fantastic.
Also part of SWAP is this red version with cuffs which I made in December, and is one of my previously sewn items.


Here's my progress to date :-

I'm away for the weekend/New Year so probably won't have anything more to post for a while. Hence why I am sewing like crazy whilst I have a couple of days to do so.
(Hopefully the cream curtain covering the fabric shelving makes a better backdrop than the bathroom door used previously, so I shall use this for the dreaded hanger shots going forwards. For the actual SWAP entry I shall have photos of me wearing the clothing.)
Friday, 28 December 2012
Frugal Fabric Friday: Bunting 'Thank You' Cards


- precut card blanks and envelopes (I used some from Dunelm Mills) or appropriate weight card cut to size to fit the envelopes.
- fabric scraps
- pencil and rubber (eraser)
- glue stick
-sewing machine and thread
Cut the fabric scraps into traingles approx one inch high and slightly narrower. Use one fabric or several co-ordinating fabrics. I had a tiny floral print, two stripes and a check all in similar colours, You can use whatever you have to hand, though I would avoid very large prints/stripes and very dark colours. You could use scraps of wallpaper or wrapping paper instead of fabric.
Using the pencil draw a curve across the card where the string of bunting will hang. Draw lightly, or erase the line afterwards if it is too obvious. I drew all my lines in slightly different ways, but you can do them all the same if you prefer.
Position the triangles of fabric along the line following the curve and making a pleasing combination, move the pieces away from the line, keeping them in the planned arrangement.
Add a dab of glue either to the back of the fabric or to the card in the correct place and position the fabric. It does not need to be covered in glue, just enough to keep it in place for when you sew later on.
Once all the triangles are positioned on the card with glue, go to the sewing machine. I threaded mine up with thread which matched the card, but you can use contrasting thread on the front if you want the stitching to be more obvious. I would keep the bobbin thread matching the card though as it looks nicer from inside. Make sure the card is unfolded and you only stitch through one layer.
Stitch along the top of the flags in a continuous line. Sew slowly and follow the curve. Start and stop slightly away from the edge of the card. Snip threads leaving enough to pull through to the back and tie off.
If you have access to a lettering kit, metallic pen or calligraphy equipment you can add a suitable 'Thank You', 'Happy Birthday', 'Get Well Soon' message onto the front of the card, otherwise leave them blank and multipurpose. Mine are intended as Christmas 'Thank You' cards.

Add a message and post to the recipient.
I think these would also sell quite well at Craft Markets, so will make a batch up for my next one.
Navy blue turtleneck
This one may or may not appear in the actual SWAP as it wasn't on the original plan but will be very useful in my wardrobe.
 This is basically the same as the striped top, except I was a bit short of fabric so have a single layer collar with a coverhemmed back seam (instead of a collar piece folded over on itself).
The navy fabric was a little boring so I added a strip of fabric down one side of the front as a detail and coverhemmed it in place so it will stretch with the rest of the garment. Hopefully this adds a little interest without taking away from the overall usefulness of a plain navy top.
I plan to wear this with navy trousers to give a 'column' and then put a bright boiled wool jacket on the top.
Thursday, 27 December 2012
SWAP 2013 : second item also completed
I'm on a roll now the machines are threaded up in navy blue, and another of my precut projects is now complete.
Its another turtle neck top based on New Look 6735 with the sleeves made full length and the soft collar replacing the neckband.
Here's the sketch I did for the storyboard :-
 And here's the actual finished item. The stripes are obviously nothing like that wide, but they are wider than the other striped fabric, which is what I was trying to indicate.
 The fabric was £2.00 per metre from my local roll end shop. As always with such places, fabric content is a complete mystery, they will never have the fabric again but the prices are cheeeeep. I have some left over for another top as I bought several metres.
Its stretchy in both directions, and is a dark navy with oatmeal, so should be good for wearing with jeans etc. With the long sleeves and loose turtle neck this is ideal for wearing under a boiled wool jacket, wool sweater or anything else warm but with annoying scratchy bits!!!
Its another turtle neck top based on New Look 6735 with the sleeves made full length and the soft collar replacing the neckband.
Here's the sketch I did for the storyboard :-


Its stretchy in both directions, and is a dark navy with oatmeal, so should be good for wearing with jeans etc. With the long sleeves and loose turtle neck this is ideal for wearing under a boiled wool jacket, wool sweater or anything else warm but with annoying scratchy bits!!!
SWAP 2013: First item completed
Here's the first new item for the SWAP, a knit dress made from a merge of New Look 6071 and New Look 6735 with an added loose turtleneck collar. This will work well under the boiled wool jacket when I make it up.
Here's the sketch from my original plan :-
 And here's the finished article :-
 The dress is just below knee length and has full length sleeves. I plan to wear it with a jacket and knee high boots.
On to the next item after lunch and a supermarket run.
Here's the sketch from my original plan :-


On to the next item after lunch and a supermarket run.
SWAP has started
SWAP - sewing with a plan - has now started over on Stitchers Guild. Actually sewing started yesterday but I've been away for Christmas and only got home last night.
 (Above is my last drawn plan, but it has changed since and I've not got round to updating it.)
I do have several knit items cut out, so would like to sew those up to get some feeling of progress, before moving on to a test piece and then to my navy boiled wool jacket!
The boiled wool jacket changes the plan a bit as I only bought enough for a jacket, not a skirt as well, so no suit. But I have several trouser lengths so will be making up one of those instead.
I shall make things up to a certain point and then re-evaluate and see what would work to complete the plan.
Looks like it has quite a lot of cool weather clothing (which works 8 months of the year here anyway!) so I want to get things sewn up and in wardrobe rotation as soon as I can. That may not be the best way for SWAP as there may be laundry accidents etc but the clothes are for wearing not admiring, so I want to use them at the right time of year.
After all the new year parties are done I'm going to have a look at following the 'Gi Diet' as it looks one of the healthier ways to eat and lose a little weight. I also want to make the effort to be more active. Depending on how well that goes I may need to alter the bottoms a little as I seem to fluctuate more on the waist and hips but I'm not going to let that stop me - either on the sewing or on the healthy eating front.
Friday, 21 December 2012
Christmas Snowmen Decorations
For this you need the following
- white air drying clay (or any air drying clay and white paint)
- rolling pin
- snowman shaped cookie cutter
- palette knife/spatula
- Sharpie marker pens
- acrylic paint
- matt spray varnish
Cut about 1/3rd of the block of airdrying clay and roll out to desired thickness. Probably about 2mm.
From a 500g block of clay I was able to make 24 decorations. though the last one uses up the leftovers.
Using the cookie cutter cut out the snowman shapes. Use a skewer to make a hole in the hat where the ribbon loop can be threaded later. Make this large enough and not too near the edge.
 Gently prise the clay from the work surface with a palette knife being careful not to pull the head off. If the figure tears, just reroll it back into the clay and start again.
 Lay the figures on newspaper on a tray or large box lid and leave to dry. I find my particular brand of clay takes 48 hours to dry completely and I turn the shapes over and then back again at intervals. It is better not to try and paint them until they are completely dry.
 Once they are dry use the Sharpie marker pens to draw hat and scarf, eyes, mouth and buttons and the nose. As my snowmen are inspired by 'The Snowman' I have a green hat and scarf but you can choose whatever colour you like. Draw the back of the scarf and hat on the rear as well. Now paint in the body of the hat and scarf on one side at a time leaving to dry in between. Turn over and do the other side.
 When dry you can redraw the knot of the scarf and the brim of the hat if you wish as this gives nice definition. Spritz with the matt varnish to keep the white pale through handling, allow to dry then attach a ribbon loop through the hole in the hat. If you are using gift ribbon it may be too wide to easily thread through the hole. Pinch the ribbon to fold the end as this makes threading it through the hole easier.
 Hang on tree and enjoy.
 Note: due to all of the drying between stages this is not a quick process. This batch of snowmen took about 5 days to produce.
- white air drying clay (or any air drying clay and white paint)
- rolling pin
- snowman shaped cookie cutter
- palette knife/spatula
- Sharpie marker pens
- acrylic paint
- matt spray varnish
Cut about 1/3rd of the block of airdrying clay and roll out to desired thickness. Probably about 2mm.
From a 500g block of clay I was able to make 24 decorations. though the last one uses up the leftovers.
Using the cookie cutter cut out the snowman shapes. Use a skewer to make a hole in the hat where the ribbon loop can be threaded later. Make this large enough and not too near the edge.


Thursday, 20 December 2012
Christmas Decorations coming tomorrow
I've not been sewing BUT I have made some more Christmas decorations out of air drying clay (as a special for a family friend) and this time I have taken some photos along the way AND kept some for my own Christmas tree. So you and I will get to enjoy them a bit.
I'm weary today though so hope to post tomorrow.
So you will get to see snowmen and gingerbread men with a bite taken out!
 My sweetie had a canvas print made of one of our holiday photos and gave it me as an early Christmas gift. It is fabulous though means I now need to introduce that wonderful shade of blue into my living room, so expect to see some blue projects in the new year, as I also have a new framed print of an antique map with a softer blue colour in the sea.
 Plus this photo (also from the holiday) with several shades of blue....
 I'm seeing patchwork denim cushions etc on that sofa!
I'm weary today though so hope to post tomorrow.
So you will get to see snowmen and gingerbread men with a bite taken out!


Saturday, 15 December 2012
Frugal Fabric Friday: Christmas Special #3
Ok so I'm posting this on Saturday, but that's because I got all excited on Friday posting my new red knit top and knit dress. Hope you don't mind too much!
This week I want to share the Christmas stokcings I made during the week and posted earlier.
1. Fleece.
Super easy to do this is unlined and based on the patterns available for download from FleeceFun.com. I made mine several squares wider, slightly taller, and slightly deeper in the foot to fit 12 jokey presents.
 Rather than just the usual single cuff I added a double cuff of cream scallops and green zipzags. Hopefully more elf than Kermit!
This is cute so I might well make another one for myself.
2. Faux suede and faux fur.
 Very faux but Oh so elegant, this is also from a pattern on FleeceFun.com.
I have more things planned so stayed tuned. And of course we start the scrap busting in earnest in January!!!!! I am really excited about that and have so many cool ideas (and so many scraps that need using up).
This week I want to share the Christmas stokcings I made during the week and posted earlier.
1. Fleece.
Super easy to do this is unlined and based on the patterns available for download from FleeceFun.com. I made mine several squares wider, slightly taller, and slightly deeper in the foot to fit 12 jokey presents.
This is cute so I might well make another one for myself.
2. Faux suede and faux fur.
I have more things planned so stayed tuned. And of course we start the scrap busting in earnest in January!!!!! I am really excited about that and have so many cool ideas (and so many scraps that need using up).
Friday, 14 December 2012
Red knit dress
Not from the same fabric as the top posted earlier, but an almost identical colour.
This is my Christmas dress for this year and is out of a fairly beefy (and hopefully almost indestructible) poly knit which feeld quite similar to my black sparkle knit.
 This is from New Look 6071 with 3/4 sleeves, forward head alteration and 4.5" added to the hem to bring it just below the knee. It is bright and fun without being too much. I shall team it with a cami, black hosiery and black knee high boots, and porbably a variety of chunky and or sparkly jewellery!
Yaaay!!!!
This is my Christmas dress for this year and is out of a fairly beefy (and hopefully almost indestructible) poly knit which feeld quite similar to my black sparkle knit.

Yaaay!!!!
Red knit top
Here's my next piece of Christmas sewing.
A red knit top, constructed in the same way as the others of this style with the exception that it has separate cuffs to bring the sleeves down to full length and be nice and warm in cold weather.
The plan is to wear this either alone with jeans, trousers or the dark red skirt, or add a purchased red boiled wool jacket over the top.
 The top is made from the remnant left over from my Rhonda Buss 'Lend Me Your Shoulder' top, and required some clever cutting and left only really small scraps, so I have definitely used my resources wisely there!
Here it is under the red boiled wool jacket - it ensures the wool doesn't touch my skin anywhere.
 The top is based on New Look 6735, with forward head alteration, neckband replaced with a collar, and the sleeves lengthened and a cuff added. It's my base block I use for tops and dresses in a few different styles so doesn't bear much resembalnce these days to the pattern!


A red knit top, constructed in the same way as the others of this style with the exception that it has separate cuffs to bring the sleeves down to full length and be nice and warm in cold weather.
The plan is to wear this either alone with jeans, trousers or the dark red skirt, or add a purchased red boiled wool jacket over the top.

Here it is under the red boiled wool jacket - it ensures the wool doesn't touch my skin anywhere.


Thursday, 13 December 2012
SWAP Plan Change
This year the SWAP (Sewing With A Plan) rules permit cutting out in advance. So I thought I would make my life a little easier and do just that.
I had planned a soft turtleneck style top for several of my knits, and started out with the irregular narrow striped remnant, wondering if the front, back, sleeve and giant collar would fit on the fabric.

 Unfortunately once I laid the fabric out on my cutting board, it was apparent that the stripes run vertically rather then horizontally, and if I have the stripes going around the body there's not enough stretch.
I ignored this once in the past and made myself a Jalie crossover top following the print rather than the stretch and the resulting top is incredibly difficult to get on and off and slightly constricting to wear, so I don't want to make that mistake again.
Another knit with stripes running up and down turned into one of my favourite knit dresses which I wear a lot in the summer, but there's not enough fabric for that as far as I can see. So this peice of fabric gets a time out for now, but may get paired with some navy scraps to become a dress with some contrast components.
I have cut a loose turtleneck out of the red fabric left from my Rhonda Buss 'Lend Me Your Shoulder' top and will probably be adding that into the SWAP as the collar will work better under the jacket.
I also found some navy blue boiled wool in the stash and am wondering if a boiled wool jacket would be more useful than the tweed, so that has been added to the fabric pile.
Fortunately the medium stripe fabric stretches in the expected direction so I should be able to get that cut out without too much excitement.
P.S. This is why I try and keep my SWAP plans relatively flexible as there's always something unexpected which happens!
I had planned a soft turtleneck style top for several of my knits, and started out with the irregular narrow striped remnant, wondering if the front, back, sleeve and giant collar would fit on the fabric.


I ignored this once in the past and made myself a Jalie crossover top following the print rather than the stretch and the resulting top is incredibly difficult to get on and off and slightly constricting to wear, so I don't want to make that mistake again.
Another knit with stripes running up and down turned into one of my favourite knit dresses which I wear a lot in the summer, but there's not enough fabric for that as far as I can see. So this peice of fabric gets a time out for now, but may get paired with some navy scraps to become a dress with some contrast components.
I have cut a loose turtleneck out of the red fabric left from my Rhonda Buss 'Lend Me Your Shoulder' top and will probably be adding that into the SWAP as the collar will work better under the jacket.
I also found some navy blue boiled wool in the stash and am wondering if a boiled wool jacket would be more useful than the tweed, so that has been added to the fabric pile.
Fortunately the medium stripe fabric stretches in the expected direction so I should be able to get that cut out without too much excitement.
P.S. This is why I try and keep my SWAP plans relatively flexible as there's always something unexpected which happens!
Tuesday, 11 December 2012
Christmas Dress: Resumed
Happily the pattern has been found and can be revealed as
New Look 6071.

 I make the dress but with sleeves (though shortened a little to 3/4 length) and add 3.5 inches to the skirt length so it comes just below the knee. I also make a forward head wedge alteration which removes from the front neckline, and adds at the back.
I have a choice of bright red, dark red, burgundy and a spot print, and am planning the bright red for Christmas.
This will give me an alternate dress to my favourite black with gold sparkle I made last year and wore a lot.
 (Imagine this only in RED!)
 Excuse my very rough attempt at photoshopping, but it gives an idea.....
New Look 6071.


I have a choice of bright red, dark red, burgundy and a spot print, and am planning the bright red for Christmas.
This will give me an alternate dress to my favourite black with gold sparkle I made last year and wore a lot.
Christmas dress: paused
Well I have the fabric out for my Christmas dress, and the serger is threaded up in red. But I have no idea where the pattern is, so probably need to tidy up some more in the sewing room.
I have just been playing in there for weeks and bringing stuff in but let it get in a right mess.
The pattern I am planning to make up is my recent favourite knot front dress made up multiple times and therefore presumably left laying around the place.
Anyway whilst I go off and tidy the sewing room you can enjoy this irreverant Christmas thought!
Elegant Christmas Stocking
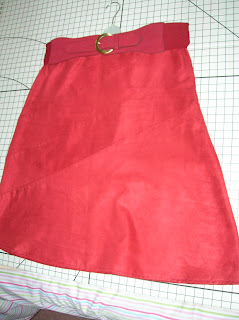
Using some of the excess cut from the bottom of the red skirt I made this rather elegant Christmas stocking with faux fur trim.
The cuff is not quite sitting flat though and has a pleat in it, so I might need to remove it and fix that.
Very different from the other stockings made so far, but I like it a lot.

Very different from the other stockings made so far, but I like it a lot.
Sunday, 9 December 2012
More Christmas Sewing
I decided today I should do some mending jobs, so I sewed a button back onto a jacket, fixed a protruding underwire and moved on to more fun stuff.
I shortened an overly long red faux suede skirt, to just below the knee and added a bit of elastic in the back waist - much more wearable with knee high boots and a nice top.
 Then I sewed the bells back on my reindeer antler headband.
 And finally I sewed my sweetie a giant Christmas stocking from three different colours of fleece!
 Next up a red Christmas dress. Will post results later in the week.
I shortened an overly long red faux suede skirt, to just below the knee and added a bit of elastic in the back waist - much more wearable with knee high boots and a nice top.


Friday, 7 December 2012
Frugal Fabric Fridays: Christmas Special #2
This week I’d like to share a couple of No Sew ideas.
1.
Fabric Decoupage Baubles
For this you need some old baubles in a redundant colour
scheme, lightweight but opaque fabric and PVA glue. The first time I tried this
I used scraps of upholstery fabric and that was rather unsuccessful. I had much
better results with scraps of polyester satin, and the purple colour is quite
festive.
The approach is fairly simple. Cut the scraps into small
pieces (no larger than 1”), apply glue onto the bauble with a brush and lay the
fabric onto the bauble. Add extra glue under the overlapping corners. You can
do the top half of the bauble, allow to dry, then turn over and do the bottom
half. Fill any gaps with another piece
of fabric. You can then coat with diluted PVA or spray varnish to seal.


2.
Fleece Mantel Scarf
This
doesn’t truly use scraps, since my source fabric is a red ‘Polarvide’ fleece
throw from Ikea. The design is very simple and uses the existing scalloped edge
on the blanket.
Measure
the depth of your mantel from the wall to the edge, and then how much of the
scarf you want to hang down at the front.
I
have a strange mantel in my rented house which is very wide, so I have had to
use both ends of the blanket in order to have a long enough scarf. A machine
sewn seam is likely to look ugly, so a few stitches holding the two sides
together is enough. You can make a neat corner if you wish to exactly fit your
mantel, but leaving the edges free is simpler.

Monday, 3 December 2012
SWAP Plans
I've done a new version of my SWAP storyboard to have the garment drawings individually imported onto a Powerpoint slide.
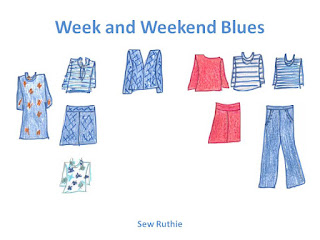
Now I can replace each drawing with the actual garment photo as I sew them and give myself that sense of progress and achievement.
The red top has already been sewn so could in theory be there already.

Now I can replace each drawing with the actual garment photo as I sew them and give myself that sense of progress and achievement.
The red top has already been sewn so could in theory be there already.
Friday, 30 November 2012
Frugal Fabric Fridays: Christmas Special #1

The 'Frugal Fabric Fridays' will start officially in January, but I'll share some Christmas themed ideas with you until then.
This week I've not had chance to do anything new so will
share with you the fabric based items I've made recently with some ideas of
what you could do with your own scraps.
Click on the title of each section to be linked to the original blog post.
Click on the title of each section to be linked to the original blog post.
The three projects I wanted to share with you are
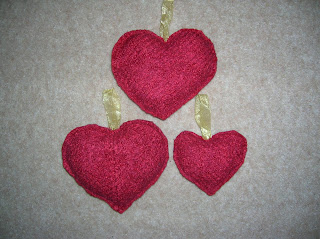
these are made from a 100% wool
jacket accidently felted in the washing machine. If you've not been this daft,
you need to use some other non fraying fabric.
Fleece, felt and boiled wool would all be suitable. The idea
of this whole series is to not go buy anything new but use up scraps, so if you
don't have any of the above, you can still do this project with ordinary woven fabric scraps, but will need to either
sew right sides together and turn the hearts through, or cut the raw edges with pinking shears and live with
a bit of fraying.
Red, pink and prints containing those colours are the
obvious choices, but neutrals/tan also work well, as do other 'pretty colours',
blue, yellow etc.

these are made from a chartreuse silk
scrap in a scrap bag from a fellow sewer. The trunks are made from a little tab
of felt. Because the edges are enclosed you can use a fabric which is more
likely to fray for these.
As it's a very stylised, you may want to stick to the
roughly green palette in order to remind yourself it is a tree. Having said
that if you plan to hang this actually on a Christmas tree, a lighter or
contrasting colour would work better.
Gold or cream could be really nice and work with lots of
colour schemes.

these are based on the patterns
you can find at FleeceFun.com. No affiliation but why re-invent the wheel? I've
used the lined curly toed stocking and my fabrics were as follows:-
main stocking a small piece of velvet remnant in my stash;
cuff - cut from a sheet in a fabric sample book; lining cut from sheeting
leftover from making a fitted sheet for my folding guest bed.
I’ve used blue which although not a traditional Christmas colour
is a favourite colour for many people.
You can use all kinds of things for Christmas stockings. It
does help if the fabric used for the main body has some weight to it, e.g.
velvet, fleece, drill, upholstery fabric etc. The lining can be any
thinner/lighter weight fabric, and the cuff can match or contrast. I’m planning
to make some more stockings using the blue velvet and various contrasting cuffs
from the fabrics in my sample book. I’m also going to look in my scraps to see
what I have in red and green, and maybe even cream, gold etc
Subscribe to:
Comments (Atom)