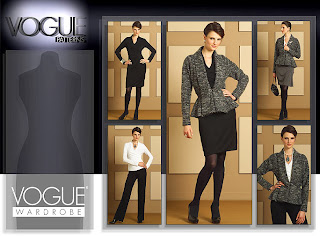
I have some more green items planned.
McCall's 5309 leggings in the same dark green jersey as the tee and skirt. These are cut out, sewn up but need the waist elastic adding.
A skirt in plain dark green stretch bengaline from Simplicity 1760, probably a plain version of view F cut as long as the small remnant will allow.
A long shirt/shirt dress from lisette K2246 View B, in a printed stripe georgette, not a recommended fabric, but I hope will work well with the leggings.
A dress from a jersey print using Simplicity 2369
A jacket from Simplicity 4231, view A in a dark green suiting fabric, may need a lining drafting. Cut out a long time ago but never sewn up.
A cowl necked top and a tee shirt from my favourite New Look 6735.
And two pairs of trousers from a Burda magazine pattern.
That's a lot of items and mostly more complicated sewing than my usual quick knits so not sure if I'll manage everything and how long it will take me.
Adventures in garment construction. (Plus random thoughts, photos of interesting places and stuff I've made!)
Quote
Black Lives Matter
Monday, 17 October 2016
Friday, 14 October 2016
Dark green skirt
The skirt is a simple one made from the back piece of the skirt in Vogue 2989 cut twice.
I've added a small piece of ribbon so I know which is the back (it has the join in the elasic).
Here it is with the tee, cardigan, the other necklace and a beautiful green leather built I have had for years.
I'm loving this.
-------------
The two pink beads in this necklace feel like they do quite fit in the colourscheme. I could easily remove them and have a slightly shorter necklace of the greens/browns and silver only. What do you think? I have a woven print fabric and a knit print I'd like to use they have the various greens and browns in them but not the pink, I think without the pink the necklace would be more harmonious with them.
The pink is in my palette and part of me thinks its fun but part of me thinks it jarring.
Would seeing the print fabrics help?
I've added a small piece of ribbon so I know which is the back (it has the join in the elasic).
Here it is with the tee, cardigan, the other necklace and a beautiful green leather built I have had for years.
I'm loving this.
-------------
The two pink beads in this necklace feel like they do quite fit in the colourscheme. I could easily remove them and have a slightly shorter necklace of the greens/browns and silver only. What do you think? I have a woven print fabric and a knit print I'd like to use they have the various greens and browns in them but not the pink, I think without the pink the necklace would be more harmonious with them.
The pink is in my palette and part of me thinks its fun but part of me thinks it jarring.
Would seeing the print fabrics help?
Thursday, 13 October 2016
Dark green tee
The next part of my dark green set is this tee.
This is a slightly altered version of the short sleeved tee from New Look 6735 (my all time most used pattern).
Here it is with the dark green cardigan from the last post and a necklace I already had.
I really pleased with how these look together. I have a skirt and leggings in progress in the same fabric as the tee.
This is a slightly altered version of the short sleeved tee from New Look 6735 (my all time most used pattern).
Here it is with the dark green cardigan from the last post and a necklace I already had.
I really pleased with how these look together. I have a skirt and leggings in progress in the same fabric as the tee.
Wednesday, 12 October 2016
Navy and Green cardigan alterations
I loved the altered dark burgundy cardigan so much that I later altered the navy one from the same shop.
Here it was before
And then after the alteration.
I also altered a dark green one I bought in a different place which was a slightly less extreme drape at the front. Here's some in progress shots to show what I did.
First I laid the cardigan out on the cutting board, folded in half, and pinned the section I was going to cut away.
I then removed this section carefully, leaving some of the collar section as a seam allowance for later.
I then sewed the finished edges of the remaining area together, this will form the new cente back neck/centre collar.
I then refolded this to stitch the neck edge back together (the new centre back neck seam is underneath in this shot).
The new cardigan then looks like this! I really love this one. I wore it less last year and the collar was less extreme so the conversion is quite smart.
I only had three of this style and they've all been converted now. I saved the self belts and the pieces I cut from the back necks as they could be useful for something......
Here it was before
And then after the alteration.
I also altered a dark green one I bought in a different place which was a slightly less extreme drape at the front. Here's some in progress shots to show what I did.
I then removed this section carefully, leaving some of the collar section as a seam allowance for later.
I then refolded this to stitch the neck edge back together (the new centre back neck seam is underneath in this shot).
The new cardigan then looks like this! I really love this one. I wore it less last year and the collar was less extreme so the conversion is quite smart.
I only had three of this style and they've all been converted now. I saved the self belts and the pieces I cut from the back necks as they could be useful for something......
Sunday, 9 October 2016
Cufflinks: shank buttons and jewellery wire
Here's some more of the cufflinks made with shank buttons and jewellery wire.
Planning these for the next charity craft stall, should be good for those men or women who wear tailored shirts to work. I've also made a few pairs for myself as I have two work shirts which use cufflinks.
Tuesday, 4 October 2016
Drape front cardigan to shawl collar cardigan
Last year drape front cardigans were everywhere. I bought 3 in different colours - dark burgundy, dark navy and dark green. Unfortunately they were not that flattering on me though I wore them anyway.
This year I noticed the cardigan in the shops whilst still long were now straight and this was much more flattering. I thought about donating my drape front ones, or maybe cutting them up using my cardigan pattern, however after a bit of experimentation I realised if I just cut a small section out of the back neck and sewed it back together I could get a straight shawl collar cardigan. So I gave it a try.
So here's what the cardigan looked like before. Those long tails hung down, and the bulk added visual weight to my tummy and hips.
Then I cut out this section from the back neck. This is the back neck removed and a new back neck and shoulder added from the front drape.
I then sewed the remainder of the neck edge to itself to form the new collar, then seamed it back up, smoothed off the corners slightly into the raglan sleeve and it looked like this.
This is now a more rectangular cardigan with a wide fold back shawl collar. The long lines of the collar and the space down the middle encourage the eye to move up and down the body creating a more flattering look.
I'm really pleased with the outcome and the other two are for the same treatment later in the week.
Thanks Ruthie
------
Let me know if you would like a few more pictures showing the process and I will try on the next one. It makes complete logical sense to me because I sew the Prima cardigan so much, so use the pattern piece and instructions as a guide, however I imagine that it doesn't work for everyone!
A similar style currently would be McCall's 6084
So the new front is a shape a bit more like this only more angular and with a wider collar.
You can see in this back image of the McCalls pattern how those lines marked CB are sewn together at the back neck.
This year I noticed the cardigan in the shops whilst still long were now straight and this was much more flattering. I thought about donating my drape front ones, or maybe cutting them up using my cardigan pattern, however after a bit of experimentation I realised if I just cut a small section out of the back neck and sewed it back together I could get a straight shawl collar cardigan. So I gave it a try.
So here's what the cardigan looked like before. Those long tails hung down, and the bulk added visual weight to my tummy and hips.
Then I cut out this section from the back neck. This is the back neck removed and a new back neck and shoulder added from the front drape.
I then sewed the remainder of the neck edge to itself to form the new collar, then seamed it back up, smoothed off the corners slightly into the raglan sleeve and it looked like this.
This is now a more rectangular cardigan with a wide fold back shawl collar. The long lines of the collar and the space down the middle encourage the eye to move up and down the body creating a more flattering look.
I'm really pleased with the outcome and the other two are for the same treatment later in the week.
Thanks Ruthie
------
Let me know if you would like a few more pictures showing the process and I will try on the next one. It makes complete logical sense to me because I sew the Prima cardigan so much, so use the pattern piece and instructions as a guide, however I imagine that it doesn't work for everyone!
A similar style currently would be McCall's 6084
So the new front is a shape a bit more like this only more angular and with a wider collar.
You can see in this back image of the McCalls pattern how those lines marked CB are sewn together at the back neck.
Tuesday, 27 September 2016
Desigual Scarf
Another of the days in Barcelona, we went into the Desigual store and bought this scarf.
As I am losing weight I didn't really want to buy any clothing, but a scarf fits whatever weight.
This has lots of wonderful soft blue and green tones which really work with my eye colour.
A lot of Desigual items are very heavy on the black which is not my best colour, so to find this pretty soft scarf was a great bonus.
In the store they had both the blue (which we purchased) and the 'red' (pink/coral/orange) version both of which I loved, but in the end I plumped for the blue version. Online there is also a greens version but this was not in the store.
As I am losing weight I didn't really want to buy any clothing, but a scarf fits whatever weight.
This has lots of wonderful soft blue and green tones which really work with my eye colour.
A lot of Desigual items are very heavy on the black which is not my best colour, so to find this pretty soft scarf was a great bonus.
In the store they had both the blue (which we purchased) and the 'red' (pink/coral/orange) version both of which I loved, but in the end I plumped for the blue version. Online there is also a greens version but this was not in the store.
Monday, 26 September 2016
Sagrada Familia Stained Glass Windows
We recently took a trip to spain staying near Barcelona and travelling in a couple of times to the city.
One day we went to the Sagrada Familia, and we had a wonderful time again there. N likes the soaring nature of the columns whilst I am entranced by the modern stained glass windows.
You may remember my very talented Auntie Joy made this quilt for my wall based on a previous photos of the stained glass windows.
Since our visit in 2012work has continued at the Sagrada Familia and even more of the windows now contain equisite stained glass. We looked for ages and eventually managed to find 'my' window again.
And finally here's my window!
I bought a small book in the gift shop all about the stained glass.
One day we went to the Sagrada Familia, and we had a wonderful time again there. N likes the soaring nature of the columns whilst I am entranced by the modern stained glass windows.
You may remember my very talented Auntie Joy made this quilt for my wall based on a previous photos of the stained glass windows.
Since our visit in 2012work has continued at the Sagrada Familia and even more of the windows now contain equisite stained glass. We looked for ages and eventually managed to find 'my' window again.
And finally here's my window!
I bought a small book in the gift shop all about the stained glass.
Sunday, 25 September 2016
Rainbow thread drawers
I bought a second hand white melamine desk. It has some damage but is basically sound. It is slightly deeper, taller and wider than the previous small childs desk I had for extra machines in the sewing room. The previous desk has now moved down to the conservatory (my location for mismatched furniture, some of which then gets donated/given to friends). The drawers of the desk is my main storage area for thread. As I have a sewing machine, overlocker (serger) and coverhem all threaded up at once when sewing knits I like to have multiple spools of thread in the same colour.
So I took some time this afternoon to watch TV, assemble some 12 section storage dividers (bought on sale and never fitting any drawers until now) and move the thread across to the new drawers.
Bobbins, embroidery thread, shirring elastic and various odd spools are stored in a wooden tray which slots into the open section above the drawers (there are multiple layers here with items in specialist boxes or shallow cardboard trays. The drawers then hold the main threads which are mostly Moon or Empress Mills, broadly sorted by colour - 1 drawer is neutrals and top stitching thread, another blues/greens and the third is pinks/purples/red/orange.
There are a few stray spools elsewhere also, but I will now be able to put them away neatly, and should be able to easily find thread for the next project.
I've not included the larger spools of overlocker thread, and I must admit I often forget to use them, so will need to come up with some sort of approach for them, perhaps using the low shelves also on the 'new' desk.
So I took some time this afternoon to watch TV, assemble some 12 section storage dividers (bought on sale and never fitting any drawers until now) and move the thread across to the new drawers.
Bobbins, embroidery thread, shirring elastic and various odd spools are stored in a wooden tray which slots into the open section above the drawers (there are multiple layers here with items in specialist boxes or shallow cardboard trays. The drawers then hold the main threads which are mostly Moon or Empress Mills, broadly sorted by colour - 1 drawer is neutrals and top stitching thread, another blues/greens and the third is pinks/purples/red/orange.
There are a few stray spools elsewhere also, but I will now be able to put them away neatly, and should be able to easily find thread for the next project.
I've not included the larger spools of overlocker thread, and I must admit I often forget to use them, so will need to come up with some sort of approach for them, perhaps using the low shelves also on the 'new' desk.
Saturday, 24 September 2016
Teal cardigan (from a throw)
There's something sold in home dec departments in the UK called a 'throw'. This is a small decorative blanket which can be artfully thrown across the sofa or bed. They are good for sunggling up when watching TV on cold winter nights.
I do have a taupe fleece and faux shearling blanket near my sofa for this purpose, however I also buy these on sale particularly when they are made from finished knit yardage and like to make cardigan jackets from them. Careful layout can utilise the ribbed edging for the finished garment and scraps can be cushions, hats, scarves and stuffing.
My latest throw was bought in the Sainsburys yesterday.
What is not too obvious from the tiny picture is that this has some silver threads running along the two ribbed edges and a smattering of tiny sequins throughout. After much debate and trying of layouts I decided to have the silver running up and down the fronts as the vertical line is more slimming than having this round the hem. This means the knitting is going round the body, though I am not finding that too upsetting.
I decided to cut the sleeves with the same detailing on the hem so the stretch is going round on the sleeves as I thought this would be more comfortable and give a nice wrist detail.
With a very loose knit fabric like this I try to keep the handling to a minimum, pin carefully on a large flat surface, then carefully gather and go to the sewing machine and immediately though the serger. Shoulder and back neckline are stabilised with ribbon.
I used a cardigan jacket pattern from the November 2010 issue of Prima magazine with the front flare reduced slightly and lengthened by about 12". Prima is a general women's magazine published in the UK, which if you subscribe comes with a free sewing pattern, often a very simple style, so good for things like this.
This has a front collar band which extends round and becomes the back neckline and collar and set in sleeves. I line up the bottom edge of the jacket with the throw edges, the front neckband with another edge and also use an edge for the sleeve hem. Then when sewn up this leaves no raw edges.
I do have a taupe fleece and faux shearling blanket near my sofa for this purpose, however I also buy these on sale particularly when they are made from finished knit yardage and like to make cardigan jackets from them. Careful layout can utilise the ribbed edging for the finished garment and scraps can be cushions, hats, scarves and stuffing.
My latest throw was bought in the Sainsburys yesterday.
What is not too obvious from the tiny picture is that this has some silver threads running along the two ribbed edges and a smattering of tiny sequins throughout. After much debate and trying of layouts I decided to have the silver running up and down the fronts as the vertical line is more slimming than having this round the hem. This means the knitting is going round the body, though I am not finding that too upsetting.
I decided to cut the sleeves with the same detailing on the hem so the stretch is going round on the sleeves as I thought this would be more comfortable and give a nice wrist detail.
With a very loose knit fabric like this I try to keep the handling to a minimum, pin carefully on a large flat surface, then carefully gather and go to the sewing machine and immediately though the serger. Shoulder and back neckline are stabilised with ribbon.
I used a cardigan jacket pattern from the November 2010 issue of Prima magazine with the front flare reduced slightly and lengthened by about 12". Prima is a general women's magazine published in the UK, which if you subscribe comes with a free sewing pattern, often a very simple style, so good for things like this.
This has a front collar band which extends round and becomes the back neckline and collar and set in sleeves. I line up the bottom edge of the jacket with the throw edges, the front neckband with another edge and also use an edge for the sleeve hem. Then when sewn up this leaves no raw edges.
Friday, 23 September 2016
Button cuff links
Here are some simple button cuff links.
Take a one inch ear wire (or length of jewellery wire) and bend into a figure of eight.
Add a shank button on each end and close up the loops, and voila, you have some cufflinks made from shank buttons.
These are the ones I have made so far. They will probably mostly go to the next craft fair (once I have taken any I like for myself)
Take a one inch ear wire (or length of jewellery wire) and bend into a figure of eight.
Add a shank button on each end and close up the loops, and voila, you have some cufflinks made from shank buttons.
These are the ones I have made so far. They will probably mostly go to the next craft fair (once I have taken any I like for myself)
Subscribe to:
Posts (Atom)