Here are hanger/dummy shots of the pieces I have made for SWAP 2019.
As the ink and teal plain knit tops look very similar, I'm including the teal one in the final version.
This year the rules for SWAP asked for 2 neutrals and an accent colour. I chose teal and ink as my neutrals and rose as the accent. I also included a print which has teal and ink and also a lighter version of the rose colour. I brought this out more on the print cardigan with rose embroidery.
I'll do some more photos of me wearing the pieces this week.
Adventures in garment construction. (Plus random thoughts, photos of interesting places and stuff I've made!)
Quote
Black Lives Matter
Monday, 29 April 2019
Sunday, 28 April 2019
SWAP 2019 - Ink Blazer Finished
I have finally finished the blazer I started at the beginning of February.
It makes a nice trouser suit with the matching trousers from the previous post.
Prima Magazine April 2010 Blazer/Jacket
I found the instructions a bit brief and the markings on the collar a little inadequate however I have managed to get a reasonable jacket which I will wear.If you have this in your stash you might enjoy sewing it, but I wouldn't go out of your way to get a copy!
SWAP 2019 - Ink Trousers
Saturday, 27 April 2019
SWAP 2019 - Rose Pink Knit Top
I've just finished a rose pink knit top for SWAP 2019, I wanted to add another accent colour to the underlying teal and ink colourways.
In particular it was planned to work with the beaded and embroidered cardigan
Back to ink for a jacket and trousers which I hope to show soon.
In particular it was planned to work with the beaded and embroidered cardigan
Back to ink for a jacket and trousers which I hope to show soon.
Friday, 19 April 2019
More Knot Bags
Fabrics chosen from my stash by the recipients, then sewn up by me.
Taupe and Duck egg for B (sewn with Taupe thread)
Taupe and Duck egg for B (sewn with Taupe thread)
Plain turquoise with vintage penguins, igloos, kayaks and polar bears for G who loves penguins.
These are a lot of fun!
Wednesday, 17 April 2019
Japanese Style Knot Bag
A lady I know showed me a little looped bag she had been brought as a gift from Japan, made from beautiful fabric. I wanted to have a go at making something myself using that idea.
YouTube Video I followed
So I went on the internet and looked at a few links, videos and etc. I followed the instructions in the one I've linked above.
Of course you can make the bag bigger or smaller or rounder but the main bit is that one handle is longer than the other for the loop.
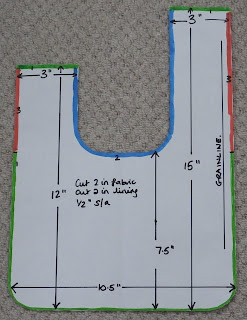
Here's my pattern
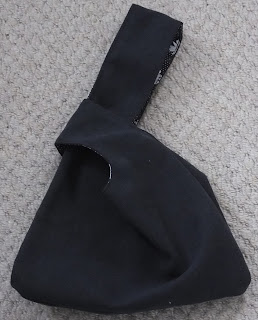
And how that looks in fabric when flat
Steps to make the bag
Prep
1. Make the pattern as per the dimensions above.
2. Cut out a pair in each of two fabrics, if very thin add interfacing.
Sew
1. Place each pair right sides together and sew the green areas.
2. Turn one right side out and right sides together sew the blue part.
3. Turn right side out, tuck seam allowances in and topstitch the red parts. I found this was quite fiddly to do so you might want to press or tack this area to make it simpler.
If you like to see this visually you can follow the YouTube video I followed.
Use non stretch fabrics. Here I've used cotton fabrics - the navy is heavy for upholstery and the print is a dressmaking fabric. However I think it could be nice in velvets and silky fabrics for evening.
Its also good for someone who knits or crochets to keep their ball of wool under control.
Thursday, 11 April 2019
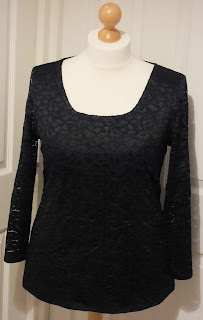
SWAP Ink Lace Knit Top
I'm back on my SWAP/wardrobe sewing again.
This piece is made from a stretch lace with a plain knit lining to the body only.
Its made from my favourite pattern New Look 6735.
I've used the direction with the greatest stretch going around the body, which was actually lengthwise on the fabric. So the hems are the selvedge.
Construction therefore was different
- centre back and shoulder seams on lining body
- centre back and shoulder seams on lace body
- neck seam (with inserted elastic)
- topstitched neckline
- basted lace and lining together around the armhole and inserted the sleeve flat.
- topstitched sleeve seam to body
- basted lace and lining together at each side, then basted the side seams and sleeve seam.
- once confirmed OK, stitched and overlocked, threading overlock ends back into the seams.
- the knit lining has a high cotton content so should be nice to wear, it is left unhemmed and slightly shorter than the lace.
Tuesday, 9 April 2019
Cotton Floral Dress
This dress is a gift for my Aunt, who asked for a cotton V neck, A line dress in blue tones. I hope this meets the brief.
Its a very simple style which just pulls on over the head. I added 3 white buttons to the front, though they get slightly lost in the print.
I used a long out of print pattern New Look 6304 which is badged as a 1 hour dress (sewing time only). I didn't time myself, but although it is a simple style, I wanted to finish it neatly and in a way that would make for easier alterations if needed so I've overlocked all the edges of the pieces before sewing them up. So I am sure it took longer than 1 hour but it hasn't been too strenuous a project.
Now to pop it in the post and await feedback before the next version.
Saturday, 6 April 2019
Testing Ikat Bag Pop Pouch
When LiEr posted the request for pattern testers for the Pop Pouch (a clever cross between a pencil case and a pen pot) I volunteered and was really happy to be one of those selected.
Pop Pouch on Ikat Bag Blog
The instructions are very detailed and enabled me to create these Pop Pouches
Based on the feedback from the testers LiEr is making some small tweaks to the instructions, so its not out for sale yet, but once it is I'll link to it.
Pop Pouch on Ikat Bag Blog
The instructions are very detailed and enabled me to create these Pop Pouches
Here they are zipped up and keeping the contents safe.
And unzipped in pen pot mode, so you can access your pens and pencils.
This one has a contrast striped lining, the others have plain linings.
It has been fascinating to challenge myself to make something different and I enjoyed learning something new.
Subscribe to:
Comments (Atom)


