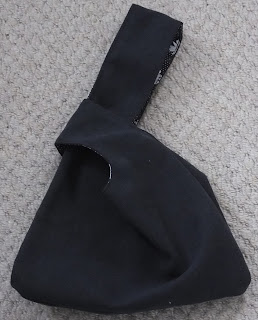
A lady I know showed me a little looped bag she had been brought as a gift from Japan, made from beautiful fabric. I wanted to have a go at making something myself using that idea.
YouTube Video I followed
So I went on the internet and looked at a few links, videos and etc. I followed the instructions in the one I've linked above.
Of course you can make the bag bigger or smaller or rounder but the main bit is that one handle is longer than the other for the loop.
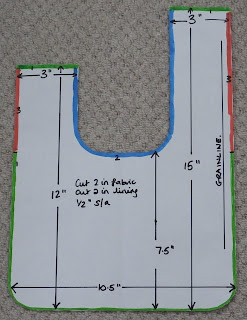
Here's my pattern
And how that looks in fabric when flat
Steps to make the bag
Prep
1. Make the pattern as per the dimensions above.
2. Cut out a pair in each of two fabrics, if very thin add interfacing.
Sew
1. Place each pair right sides together and sew the green areas.
2. Turn one right side out and right sides together sew the blue part.
3. Turn right side out, tuck seam allowances in and topstitch the red parts. I found this was quite fiddly to do so you might want to press or tack this area to make it simpler.
If you like to see this visually you can follow the YouTube video I followed.
Use non stretch fabrics. Here I've used cotton fabrics - the navy is heavy for upholstery and the print is a dressmaking fabric. However I think it could be nice in velvets and silky fabrics for evening.
Its also good for someone who knits or crochets to keep their ball of wool under control.


3 comments:
I love this!!
This is the easiest to follow explanation I have found....thankyou
Thankyou for a very clear explanation of how this bag is made. By far the best I have seen
Post a Comment