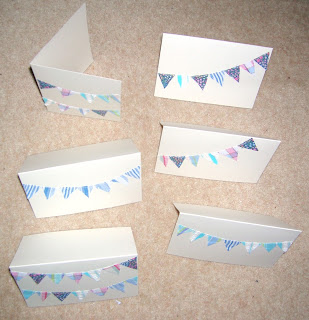
We've not officially started Frugal Fabric Fridays as its not yet 2013, but I wanted to sneak in this little craft project - Bunting Thank You cards.
The basic idea here is to sew miniature bunting flags onto cards, and its pretty much as simple as it sounds. I've not done a tutorial with pictures, but really, you don't need it.
For this you need the following
- precut card blanks and envelopes (I used some from Dunelm Mills) or appropriate weight card cut to size to fit the envelopes.
- fabric scraps
- pencil and rubber (eraser)
- glue stick
-sewing machine and thread
Cut the fabric scraps into traingles approx one inch high and slightly narrower. Use one fabric or several co-ordinating fabrics. I had a tiny floral print, two stripes and a check all in similar colours, You can use whatever you have to hand, though I would avoid very large prints/stripes and very dark colours. You could use scraps of wallpaper or wrapping paper instead of fabric.
Using the pencil draw a curve across the card where the string of bunting will hang. Draw lightly, or erase the line afterwards if it is too obvious. I drew all my lines in slightly different ways, but you can do them all the same if you prefer.
Position the triangles of fabric along the line following the curve and making a pleasing combination, move the pieces away from the line, keeping them in the planned arrangement.
Add a dab of glue either to the back of the fabric or to the card in the correct place and position the fabric. It does not need to be covered in glue, just enough to keep it in place for when you sew later on.
Once all the triangles are positioned on the card with glue, go to the sewing machine. I threaded mine up with thread which matched the card, but you can use contrasting thread on the front if you want the stitching to be more obvious. I would keep the bobbin thread matching the card though as it looks nicer from inside. Make sure the card is unfolded and you only stitch through one layer.
Stitch along the top of the flags in a continuous line. Sew slowly and follow the curve. Start and stop slightly away from the edge of the card. Snip threads leaving enough to pull through to the back and tie off.
If you have access to a lettering kit, metallic pen or calligraphy equipment you can add a suitable 'Thank You', 'Happy Birthday', 'Get Well Soon' message onto the front of the card, otherwise leave them blank and multipurpose. Mine are intended as Christmas 'Thank You' cards.
Add a message and post to the recipient.
I think these would also sell quite well at Craft Markets, so will make a batch up for my next one.


2 comments:
Great idea - particularly useful to use up little bits of fabric scraps.
Very cute idea!
Post a Comment