Quote

Black Lives Matter

Thursday, 11 April 2019

SWAP Ink Lace Knit Top

I'm back on my SWAP/wardrobe sewing again.

This piece is made from a stretch lace with a plain knit lining to the body only.
Its made from my favourite pattern New Look 6735.
I've used the direction with the greatest stretch going around the body, which was actually lengthwise on the fabric. So the hems are the selvedge.

Construction therefore was different
- centre back and shoulder seams on lining body
- centre back and shoulder seams on lace body
- neck seam (with inserted elastic)
- topstitched neckline
- basted lace and lining together around the armhole and inserted the sleeve flat.
- topstitched sleeve seam to body
- basted lace and lining together at each side, then basted the side seams and sleeve seam.
- once confirmed OK, stitched and overlocked, threading overlock ends back into the seams.
- the knit lining has a high cotton content so should be nice to wear, it is left unhemmed and slightly shorter than the lace.

Tuesday, 9 April 2019

Cotton Floral Dress

This dress is a gift for my Aunt, who asked for a cotton V neck, A line dress in blue tones. I hope this meets the brief.
Its a very simple style which just pulls on over the head. I added 3 white buttons to the front, though they get slightly lost in the print.
I used a long out of print pattern New Look 6304 which is badged as a 1 hour dress (sewing time only). I didn't time myself, but although it is a simple style, I wanted to finish it neatly and in a way that would make for easier alterations if needed so I've overlocked all the edges of the pieces before sewing them up. So I am sure it took longer than 1 hour but it hasn't been too strenuous a project.
Now to pop it in the post and await feedback before the next version.

Saturday, 6 April 2019

Testing Ikat Bag Pop Pouch

When LiEr posted the request for pattern testers for the Pop Pouch (a clever cross between a pencil case and a pen pot) I volunteered and was really happy to be one of those selected.
Pop Pouch on Ikat Bag Blog

The instructions are very detailed and enabled me to create these Pop Pouches
Here they are zipped up and keeping the contents safe.

And unzipped in pen pot mode, so you can access your pens and pencils.

This one has a contrast striped lining, the others have plain linings.

It has been fascinating to challenge myself to make something different and I enjoyed learning something new.

Based on the feedback from the testers LiEr is making some small tweaks to the instructions, so its not out for sale yet, but once it is I'll link to it.

Thursday, 28 March 2019

ReP-A-R-E (RePurposing, Alterations, Repairs and Embellishments) #12

ReP-A-R-E (RePurposing, Alterations, Repairs and Embellishments) #12 is a set of lavender sachets in the same fabric as the pattern weights.
Each one is made from a rectangle of cotton fabric, 20cm x 10cm (8" x 4"), fold in half, stitch 2 sides closed and snip the corner off. Turn through, fill with lavender and stitch up flat to give small squares.

These are now nestling in my sock drawer. (The Lavender was from France, a gift from family when they holidayed there)


Wednesday, 27 March 2019

ReP-A-R-E (RePurposing, Alterations, Repairs and Embellishments) #11

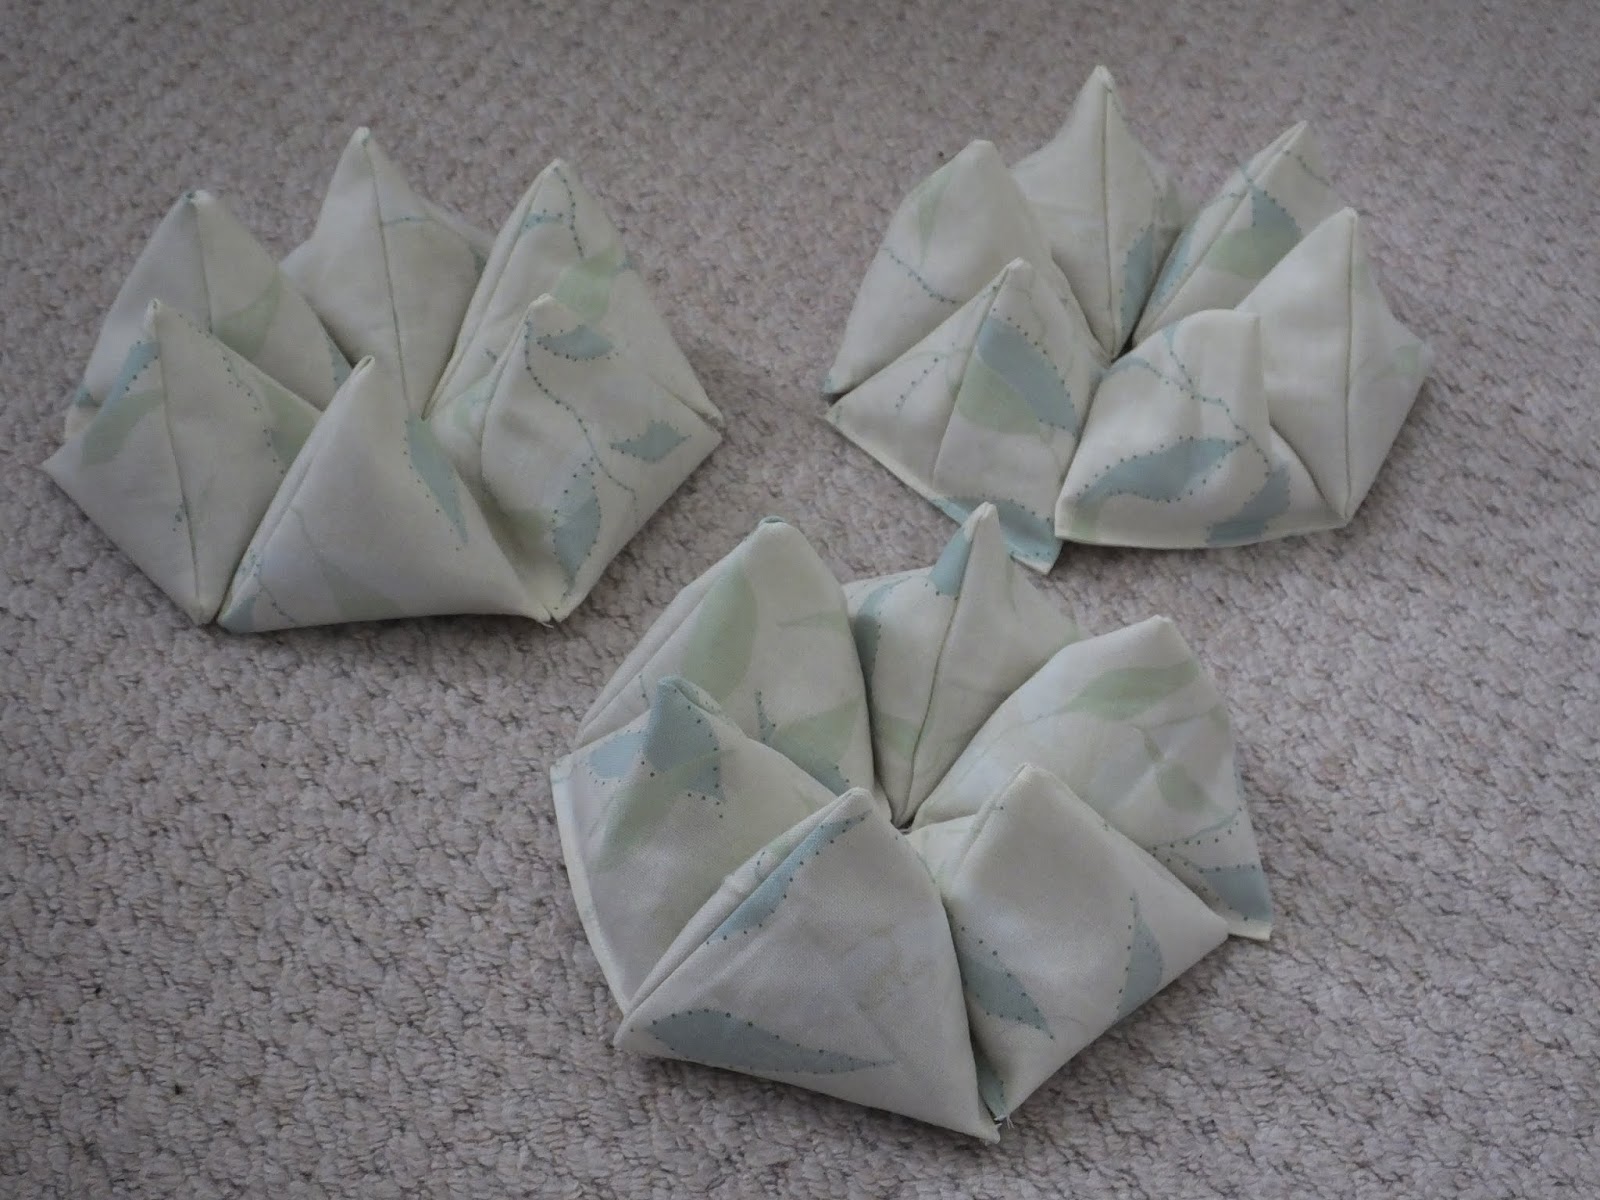
ReP-A-R-E (RePurposing, Alterations, Repairs and Embellishments) #11 is some pattern weights (one and a half dozen seemed enough).
Each one is made from a rectangle of cotton fabric, 20cm x 10cm (8" x 4"), fold in half, stitch 2 sides closed and snip the corner off. Turn through, fill with rice and close with the side seam to the centre of the opposite side forming a pyramid.
The fabric I have used here is "Greenwood" from Arthur Sanderson & Sons made in 2004. I have a remnant of it from an unknown source. It is a cream background with blue, green and white leaves and very pretty. For the pattern weights I've ignored the print direction.

The 'leaf' is my favourite motif and so I often buy leaf print fabrics.

Saturday, 16 March 2019

ReP-A-R-E (RePurposing, Alterations, Repairs and Embellishments) #10

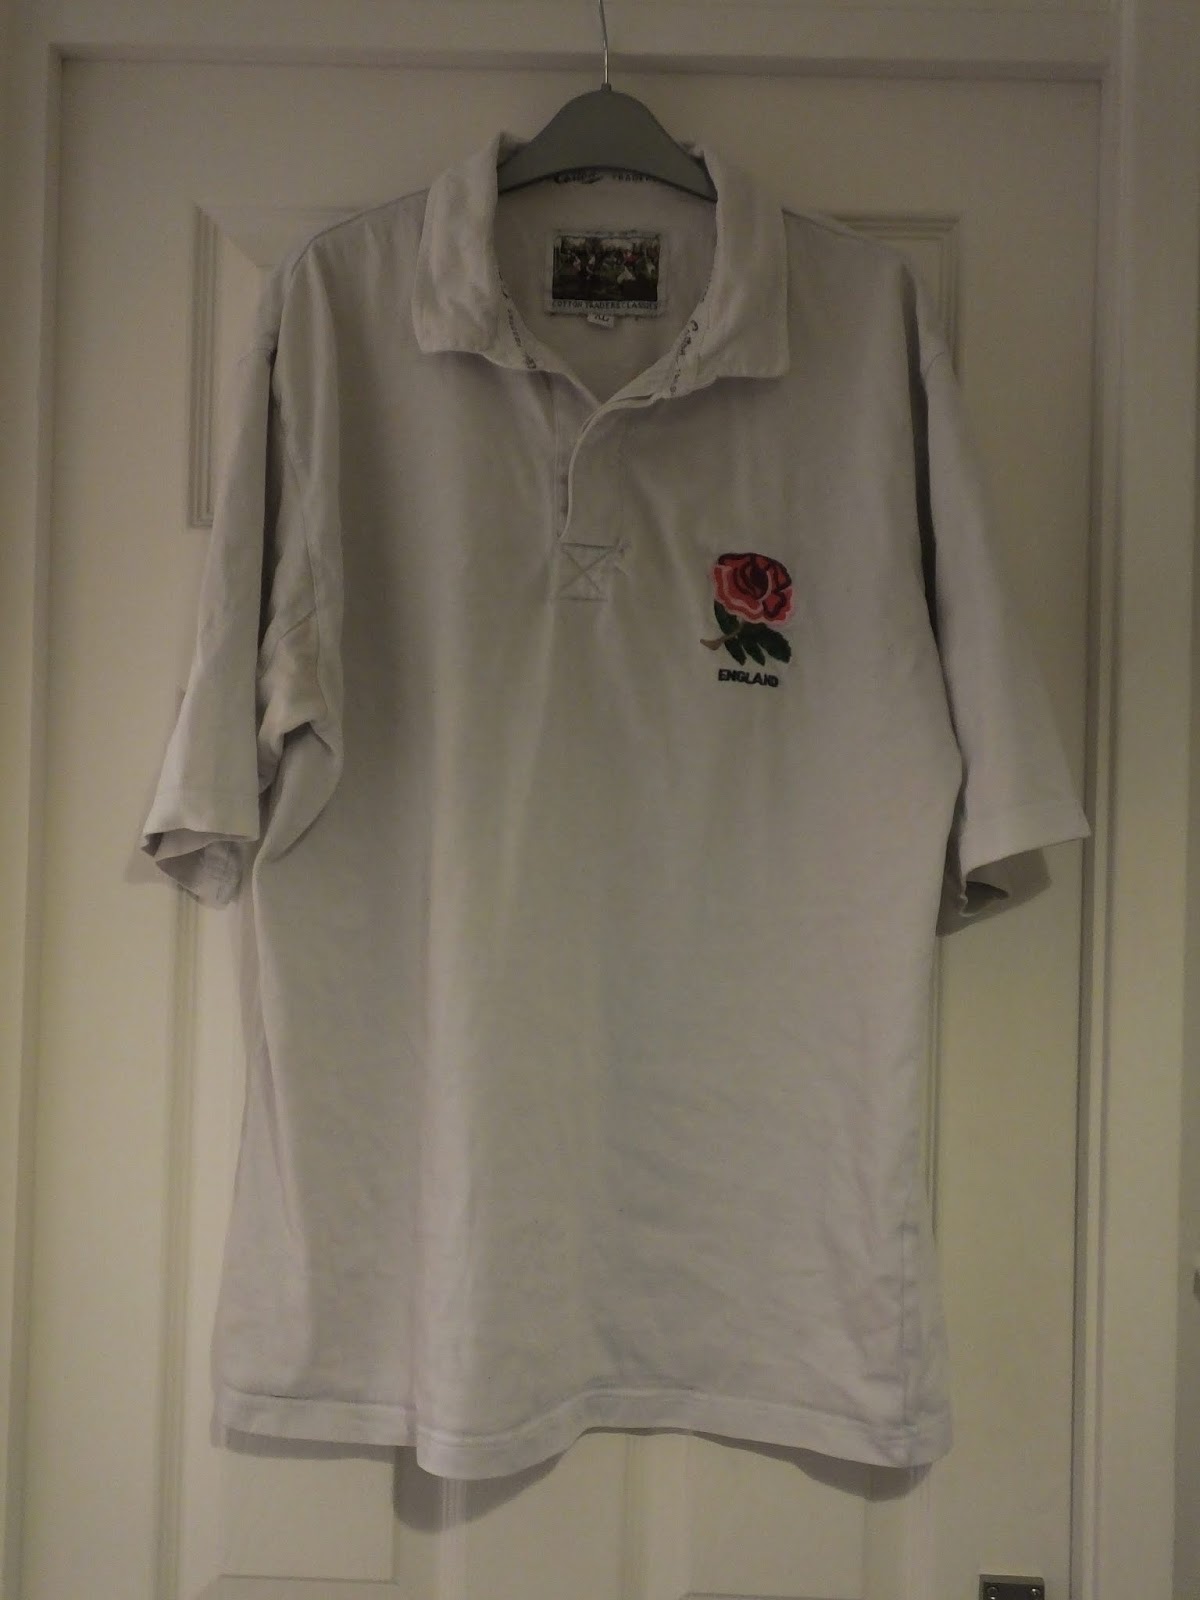
ReP-A-R-E (RePurposing, Alterations, Repairs and Embellishments) #10 was a fun repurposing job, turning an old adult England Rugby shirt into a pint sized version for the mascot!
Here's the XL shirt I started with, a bit grey generally and very discoloured under the arms but it has the all important rose logo.
Here's the mascot in his new shirt and shorts.
For the shirt I kept the collar and logo of the original shirt but cut the sides and bottom away. I used the bottom section of the sleeves to make new smaller sleeves, and coverhemmed the hem of the shorter shirt.
The shorts were made from a the lower edge of the shirt. 
With a stitched opening for the tail.
As this is a sitting bear I lengthened the back crotch and shortened the front crotch.

I didn't use a pattern for the shirt, just made it to fit the bear.
For the shorts I used New Look 6961 as a starting point then shortened the legs to shirt, angled the waist to give a longer back crotch/shorter front crotch and stitched round a hole I had left for the tail.

He can cheer the team at kick off. I'll come back and tell you if we won later on!!!

ReP-A-R-E (RePurposing, Alterations, Repairs and Embellishments) #9

ReP-A-R-E (RePurposing, Alterations, Repairs and Embellishments) #9 is a basic repair rehemming trousers which have come down.
The hem had come down on some RTW trousers. As it was 3/4 undone anyway I unpicked the last few inches to make it easier to rehem them.
I used the blind hem foot and stitch, starting at the inside leg seam.
It looks like this once complete.
Here's the stitching 
And the inside hem. No shot of the outside but there are tiny little 'V' shaped stitches which are not noticeable on a textured fabric like this. On a very smooth fabric they might be more obvious, but I like this as being quick, neat and secure.


Thursday, 14 March 2019

ReP-A-R-E (RePurposing, Alterations, Repairs and Embellishments) #8

ReP-A-R-E (RePurposing, Alterations, Repairs and Embellishments) #8 is an alteration.

It is quite hard to see from the photos but the front of this purchased knit sweater was longer than the back, (which might've been why it was in the sale). This might be good for someone with a larger bust but on me it was not.
This photo is from the back, showing the front being longer.

I wanted to keep what length I could at centre back so unpicked the original coverstitching, pressed it flat, drew a new curve with my French curve, cut it off and then rehemmed it with my coverstitch machine.
The front and back are now the same length and curve very slightly to the sides.

* note on unpicking coverstitching. 
It is in essence a twin needle chain stitch so if you can get it started the underneath thread will unravel for long sections, this goes for both RTW and home coverstitched items. I find where they have overlapped the stitching and unpick about an inch with my seam ripper. Then I get the underneath thread and try pulling it, eventually one side will start to come undone and I pull it as far as it will go. On this top I unpicked the overlap, the opposite side seam and one other place where it had caught, and just pulled all the rest.

ReP-A-R-E (RePurposing, Alterations, Repairs and Embellishments) #7

ReP-A-R-E (RePurposing, Alterations, Repairs and Embellishments) #7 is a drawstring bag made from a scrap of fabric and some ribbon from my haberdashery supplies.
This one is a good size for shoes, but I like to have them in different fabrics and sizes when travelling as they help keep things separate in my larger bag.

When I am sewing these little bags I finish the edges of the sides first (usually on the overlocker), then sew up the side seam(s) leaving a gap for the ribbon/cord to come out later.
Then I fold the top down and stitch to make a casing, and then thread the ribbon in through the gap left in the side seam round and back out again.

Tuesday, 12 March 2019

ReP-A-R-E (RePurposing, Alterations, Repairs and Embellishments) #6

ReP-A-R-E (RePurposing, Alterations, Repairs and Embellishments) #6 DuckEgg hoody pocket fix, was a really simple one in the end, and took longer finding a suitable colour of thread than it did to actually sew it on the sewing machine.
This is the before shot, the stitching has come undone at the top of a kangaroo pocket on a casual hoody.
This is the after when I've sewn it back up (reversing over the edge a few times). I also stitched the same area on the other pocket as a preventative measure as the top stitch looked to have come out of that.
Now I am fully aware that this was an easy fix, and normally I don't bother mentioning stuff like this on the blog. However it has probably been waiting for that 10 minute fix now for over a year which when I think about it objectively is a bit silly. So once I've dealt with the backlog perhaps I need to schedule a mending slot once a month going forwards.

The hardest part of this fix was finding suitable thread which matched well enough for me to be happy with it. This flagged up that I keep thread in 4 places, and the embroidery thread and serger cones in particular are not very accessible. I used an odd serger cone in the end as the best match.

I might like some wall mounted serger cone storage (well away from light) but not quite sure what approach would be best. How do you store your serger cones?

Sunday, 10 March 2019

ReP-A-R-E (RePurposing, Alterations, Repairs and Embellishments) #5

ReP-A-R-E (RePurposing, Alterations, Repairs and Embellishments) #5 is a no sew one, but has been really great for me so worth sharing I thought.

I have a lovely dark burgundy/oxblood leather bag which I started using again, but realised the existing handles were not quite long enough to have it over my shoulder. and when I went shopping it was rather in my way on my arm, as I prefer shoulder bags.

I recalled I had a soft tying belt for a leather coat in a similar colour, but didn't use it as the coat has no belt loops and looks better without it.
I added a plain silver key ring to each of two of the D rings holding the original handles, looped the belt through and knotted it. I now have a soft shoulder strap for the bag, which makes it much nicer to carry. If I change my mind in future I can remove the belt and key rings with no damage to the belt or the bag, but in the meantime I am using the bag and enjoying it!

Some sewing on the next one honest!

Saturday, 9 March 2019

ReP-A-R-E (RePurposing, Alterations, Repairs and Embellishments) #4

ReP-A-R-E (RePurposing, Alterations, Repairs and Embellishments) #4 is using scraps and haby from the stash.

I made a whole load of mini bunting to decorate my bathroom and tie in with my blue towels.

It was fairly fiddly, and some of the points are not that great.
It used multiple different fabrics in shades of blue, beige and white from the scrapbox.

I made my own template for pennants which are 2.5 inches tall and 2 inches wide plus seam allowance. They were deliberately small as I was using them in a small bathroom in multiple places.

Each flag has the same fabric both sides, stitched, turned, pressed, topstitched and then arranged semi randomly. I sewed them onto premade bias binding which is perhaps a little wide for the teeny triangles but was what I already had.

It gives a really fun feeling to the bathroom which makes me smile. I used double sided sticky tape to attach to the blind, mirror and etc.

Friday, 8 March 2019

ReP-A-R-E (RePurposing, Alterations, Repairs and Embellishments) #3

ReP-A-R-E (RePurposing, Alterations, Repairs and Embellishments) #3 is a super simple one.

Sometimes when I am out walking I prefer a hat to a hood or umbrella. However the hat sometimes blows off in the wind.
I had saved a section of dark green elastic cord from some walking trousers and used it to make a cord to hold the hat on.
I pulled the lining away from the hat and then used a narrow zigzag to attach the elastic cord to the lining.

I mostly wear it with the cord tucked under my hair, but if it gets more blustery I can tuck the cord under my chin for extra security.

Thursday, 7 March 2019

ReP-A-R-E (RePurposing, Alterations, Repairs and Embellishments) #2

RePARE #2 is probably mostly an Alteration.

I had this fleece which had gone shorter and wider over time. I reshaped the side seams and wore it, but found the sleeves (and body) were a bit short.
As it had a black zip, I thought a black and red jacquard knit would work well for bands at the wrist and hem.
I think it works quite well. The bands are 6 inches wide. I cut the old hems off as they were quite worn and replaced them with the new bands, adding a bit of length in the process.

This could be used to lengthen garments which are a bit short (e.g. growing kids) and/or replace worn cuffs/hems.

Another RePARE coming soon.

Wednesday, 6 March 2019

ReP-A-R-E (RePurposing, Alterations, Repairs and Embellishments) #1

I'm working through a number of ReP-A-R-E projects as my sewing room is overflowing with them.

ReP  - RePurposing
A - Alterations
R - Repair
E - Embellishments

ReP-A-R-E #1 is a RTW dress which is just a tiny bit short for me. So this is probably an embellishment (though its sort of an alteration as well).


The dress had a black mesh section at the front neckline with silver and diamante bead decoration.


I decided therefore that echoing the black with a black stretch lace on the hem would work colour wise and also with the level of dressiness.
There was just enough of the stretch lace left over to also trim the sleeves so I did that too for continuity. The lace came from my stash of haberdashery and it was great to use it all up!

The stretch lace was hand sewn to the inside of the existing hem whilst watching TV. It had one edge which was straight so was easy enough to sew little slip stitches.
I'm not a very fast hand sewer but I'm pleased with the end result of this one.


Another RePARE soon.

Ruthie